Its just a bunch of Hocus Pocus DIY
- thekingdomtwins

- Aug 26, 2019
- 3 min read
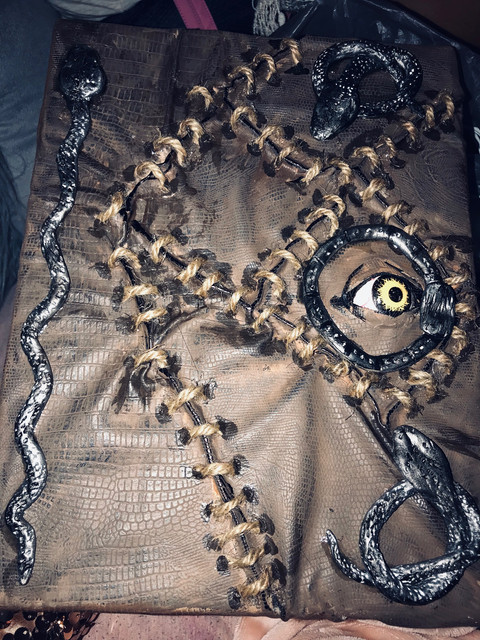
The very requested tutorial for our DIY book of spells from the Hocus Pocus movie is finally here!
As the spooky season approaches Disney, we will be trying to give you guys fun affordable ideas to spice up your outfits.

This idea came to us while roaming around Michaels a few days ago.
We found some Happiness Blooms Small Garden Box By Ashland® in the sales section and thought how cool those would look if we gave them a Halloween look. Once we decided we wanted to make them look like the hocus pocus spell book, we had no time to waste. We had 2 days to make these come a reality for our first MNSSHP.
It was hard trying to find exactly what we needed, But we found everything in just a few hours and got straight to work!
Here is a list of all the supplies we used (with links) to make this boxes. Be creative and if you find something different you like better use it! This is just what worked best for us!
- Link for box: which we’re on sale for $5.99 https://www.michaels.com/happiness-blooms-small-garden-box-by-ashland/10584567.html
- Assorted Foam Eyeballs by Ashland® for only $2.00 in the Halloween section at Michael https://www.michaels.com/assorted-foam-eyeballs-by-ashland/10596800.html
-A few different shades of brown paint and a couple of paint brushes.
-Hot glue guns and lots of glue!
White: https://www.michaels.com/jute-twine-by-celebrate-it/10398003.html
-Designer Fabrics G033 54 in. Wide Brown, Crocodile Faux Leather Vinyl Fabric at Walmart and paid only $7.99 for 1 yard which was more than enough to make 2 purses. https://www.walmart.com/ip/Designer-Fabrics-G033-54-in-Wide-Brown-44-Crocodile-Faux-Leather-Vinyl-Fabric/46267791
-Prang DAS Air-Hardening Modeling Clay, Multiple Weights in White to make all the little details on the book. Make sure you have silver and black paint for paint them after they harden. https://www.walmart.com/ip/Prang-DAS-Air-Hardening-Modeling-Clay-Multiple-Weights-White/46061439
Black and metallic silver paint (craft store)
E6000 glue (craft strore)
INSTRUCTIONS (with pictures)


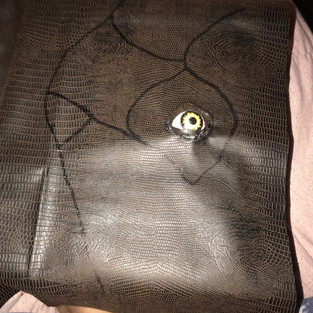
1. First you want to start off by cutting out a hole for where you will be placing the eye.
2. Using some of the fabric, glue it around the eyeball to make it look like if it has eyelids. To make it easier to place the eye lid in the hole, we glued it to a piece felt and use that to glue it with hot glue to the inside of the box.


3. With a permanent marker, draw on the fabric where you want the wrinkles to be.
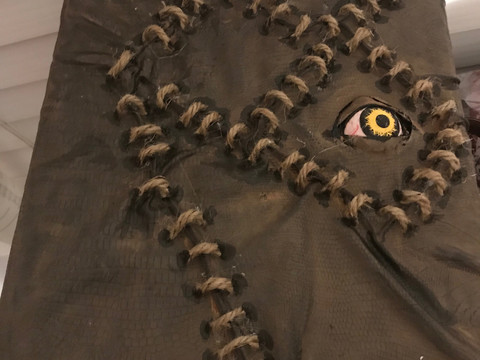
4. Start gluing the fabric around the entire box. We started from the eye to make it easier by having a guide on where to start. Use the hot to make the wrinkles. Place the hot glue directly on the box and when placing the fabric over it, with your fingers squeeze the hot glue in place where you want the wrinkles to form. Do with on the entire box. Until completely covered.


5. Next paint the book with all the different shades of paint. Make sure you start by layering from lightest to darkest color. But DONT cover it completely, you want it to look old and uneven. We used an old towel to wide away some paint as we layered each color.
6. Cut out small pieces of twine. This is going to be your stitching. With hot glue place each piece of twine in the sections you want.


7. With the white clay make the small snake detail that goes on the book. It doesn't have to look perfect because you will paint over it with Silver paint when its hard. This was probably the hardest part since you want to try and make it look like snakes. but I think we did a pretty good job.
8. Paint clay with the silver metallic paint and let clay sit over night to give it time to dry.

9. With the E6000 clay place all the clay pieces on the book and place something over the book to help weigh down the pieces while the glue dries and to prevent anything from falling off.
10. With black paint go over a few parts of the snake and book to make it look old and rusty.


Comments